Wednesday, December 31, 2008

Tall and Creamy Cheesecake

IMG_0935

I really enjoy being a part of the Tuesdays with Dorie baking group. Over the last few months, I have had the opportunity to try out a lot of different kinds of treats. Additionally, I have been able to experiment with the recipes and try out different kinds of things, like this Black and White Cheesecake.

IMG_0937

Sometimes, though, I get really excited and try to rush through some of the instructions. Unfortunately, it turns out that you really do need to let the cheesecake cool and set before you cut into it. Or else this is what happens...

IMG_0942

But at least the picture turned out cute. I don't know why, but I really do love this picture.

Monday, December 29, 2008

The Best Cinnamon Bread. Ever.

When I moved into my first apartment the fall of my sophomore year at college, I was suddenly faced with the fact that I didn't know how to cook.

Cinnamonny goodness!

Growing up, my mother hadn't spent much time in the kitchen, and I had mastered her handful of go-to dishes by the time I had graduated from high school. And yet, I wasn't entirely ready to supply myself with my every meal. I missed my old dining commons and the convenience of always having freshly prepared food waiting for me.

My friends and I began sharing our cookbooks and recipes. We would sit around and copy recipes by hand from each others books.

This cinnamon bread treat was one of our early favorites and the first one that I helped to collaborate to write. I remember fiddling with the cooking time (it needed to be longer) and playing with the amount of cinnamon (doubling, then tripling it), the same kinds of things I do with recipes these days.

I love that making this bread reminds me of those times - the real beginning of my cooking career.

The Best Cinnamon Bread. Ever.
1/2 cup butter
1 cup sugar
2 eggs, separated
1/2 cup milk
1 1/2 cup flour
2 1/2 teaspoon baking powder
1 1/2 teaspoon cinnamon (I prefer to use freshly grated cinnamon, but the jarred stuff works too)

Preheat oven to 350 degrees. Butter and flour a loaf pan to cook bread in.

Sift together dry ingredients. Cream together butter and sugar.

Once butter and sugar are light and fluffy, add a third of the dry ingredients and stir until just mixed. Add a third of the milk and stir just mixed. Continue while alternating dry ingredients and milk until just combined.

Beat egg whites to stiff peaks in separate bowl. Fold beaten egg whites into batter. Stop as soon as eggs are incorporated so that bread does not become tough.

Pour batter into butter and floured loaf pan and bake for an hour, or until the top of the bread is golden and a toothpick inserted into the center comes out clean.

Once the bread comes out of the oven, cool on a rack. The bread can be topped with a pad of butter and/or a sprinkle of powdered sugar.

**When I have apple butter on hand, I often substitute out half of the butter for an equivalent amount of apple butter for an extra layer of flavor.**

Tuesday, December 23, 2008

Cinnamon-Caramel Bread Pudding

My high school boyfriend took every opportunity he had to eat bread pudding. He loved the stuff, but I wouldn’t touch it. Ever. In fact, I always cringed when he ordered it off of the menu. It was gross and tended to have a lot of rum (yuck!) and raisins (double yuck!!) in it. For years, my feelings about bread pudding were influenced by the sticky glop that was bathed in the neon glow of cheap diners.

Some of my favorite things...

Little did I know, years later I would be introduced a bread pudding that would be much more my style – filled with chocolate and sweet bread. But that was just an introduction to everything that bread pudding could – and should – embody.

I made this recipe to take to the same party as the Mexican rice, and I thought it was fabulous. It was a far cry from the rum raisin monstrosities of my past. And, it gave me an excuse to make my newest favorite caramel recipe, as well as whipped cream from scratch, which is so much better than the canned kind.

Super smooth whipped cream!

The only problem I had with this recipe was the sheer amount of bread pudding it made! I ended up with way more than expected, and the 20+ people at the party only finished off about two thirds of it. The rest of the dessert remains in my refrigerator where it daily tempts me into eating enough of it to make myself sick. Actually, now that I think of it, I am kinda hungry…

Cinnamon-Caramel Bread Pudding
20 slices of cinnamon bread (or 1 1/2 loaves of this cinnamon bread)
12 eggs
2 ½ cups milk
1 cup whipping cream
1 cup sugar
2 tablespoons vanilla extract
1 ½ teaspoons finely grated orange peel
Pinch of salt

Cut bread into ¾ inch cubes. Whisk remaining ingredients together in large bowl until the sugar dissolves. Fold bead into egg mixture and toss to coat. Cover with plastic wrap and place in the refrigerator to chill four at least 4 hours or overnight.

When ready to bake the bread pudding, preheat the oven to 375F, stir bread mixture and let stand at room temperature for 30 minutes.

Pour bread mixture into buttered, 13x9 baking dish. Spread bread mixture until it is evenly distributed throughout the pan. Bake until golden and puffed up. Test doneness with a toothpick which should come out clean. This should take 40-55 minutes.

IMG_0815

Caramel Sauce
2 cups sugar
1/2 cup water
1 1/2 tablespoon corn syrup
2 tablespoons unsalted butter
2/3 cup heavy cream

Put the sugar, water and corn syrup in a medium heavy bottomed saucepan, stir just to combine the ingredients and then put the pan over medium-high heat.

Heat, without stirring , until the caramel turns deep amber, about 5-10 minutes. Lower the heat a bit and, standing back from the saucepan add the cream and butter. When the spatters begin to subside, stir to calm down the caramel and dissolve any lumps. Pour the caramel into a Pyrex measuring cup or heat proof bowl.

Allow the topping to set at room temperature-about 20 minutes before serving. The caramel can be put in an air tight container and stored in the fridge ahead of time. It will be the consistency of peanut butter but can be warmed up in the microwave to make it easier to work with.


Whipped Cream
1 cup heavy whipping cream
1 1/2 tablespoons powdered sugar (yo u can use more or less to adjust the sweetness of the final product)

Add cream and powdered sugar in a medium bowl. Beat with a hand mixer for several minutes until stiff peaks form. Keep refrigerated until use.

(sources: bread pudding - Gourmet magazine, caramel - Dorie Greenspan's book Baking: From My Home to Yours)

IMG_0809

Monday, December 22, 2008

Mexican Rice...Finally!

I made a pot of Mexican rice last week. I attempted to make a pot of Mexican rice last week. Let’s just say it turned out very al dente.

This was supposed to be my test batch of rice, my trial run before I served the dish to my boyfriend’s family. I thought that worst case, I would determine that the recipe required more salt, or a little less stock. I never even considered that I might make a terrific mess out of the simple recipe.

IMG_0803

But I did, and it was horrible. Definitely not something I would feed to anyone, especially people whom I was trying to impress.

So it was back to the drawing board with less than a week to come up with a simple Mexican rice recipe for the Mexican themed holiday party Diesel’s family was throwing.

I literally lost sleep over the past week as I stressed out about a simple dish of Mexican rice. Trying to be the ever helpful and perfect boyfriend, Diesel brought me home two packets of instant Mexican rice – just add water.

I was less then amused. I was on a mission to make a decent batch of Mexican rice from scratch, and something that came out of a processed package was not what I had in mind.

IMG_0804

Thankfully, not only did I find a recipe, but it turned out perfectly. And it was so easy! Not even I could screw it up. The rice was so fluffy and delicious, I definitely think that this will turn into my go to side dish whenever I decide to crank out my favorite tacos or enchiladas.

Mexican Rice
Serves 4-6

1 cup of medium or long grain rice, uncooked
2 cups of chicken stock
1 tablespoon of butter
1 tablespoon of extra virgin olive oil
1 small onion, finely diced
4 cloves of garlic, minced or grated
1/4 cup of tomato paste
1 tablespoon of lime juice
1/2 cup of cilantro, finely chopped
1 tablespoon of cumin
Salt to taste

Add rice, chicken stock and butter into a pot. Bring to a boil on high, stir once and cover.

Simmer on low for 20 minutes, then remove from heat and keep covered for 5 to 10 minutes longer.

Meanwhile, in a skillet, cook onions in oil for 10 minutes or until just about to brown. Add garlic to pan and cook for one minute. Stir in tomato paste and cumin and cook for one minute.

Mix in cooked rice, lime juice and cilantro, and season to taste.

Note: I doubled this recipe and didn't have any problem. In fact, I wished I had made an even larger batch as I didn't end up having any leftovers!

Thursday, December 18, 2008

Linzer Sables

IMG_0773

In the words of my boss, “These cookies are freaking good!” I may not get that kind of praise for my daily work, but at least he can appreciate my baking.

I have always adored the look of Linzer cookies. The perfect little cutout design, the colorful jam filling and you just can’t go wrong with powdered sugar. They always look so perfect. (I am beginning to notice an interesting trend in that I often seem to concern myself more with the looks of a cookie, rather than other aspects, such as the taste.)

IMG_0729 paint

I included these cute little cookies in the holiday treats that I gave out to all of my coworkers, and they were really well received. Not that I was surprised by that. Who doesn’t LOVE cookies. But I did get a few requests for the recipe which always gives me a warm, fuzzy feeling inside. Hell, I must have done something right if they want to make these cookies for themselves.

Yay. I love having excuses to make sweet things.

Wednesday, December 17, 2008

A Happy Holiday

Today I sent out my third package as part of Operation Baking Gals. This time, I included about five dozen cookies (sugar cookies, chocolate crinkle cookies and chocolate chip), a local newspaper and a Christmas card. It warms my heart to be able to participate in this program and support our troops overseas. I can’t even imagine how hard it must be to be away from your family for such an extended period of time, especially during the holidays. I just hope this package finds my soldier safe and well.

IMG_0776

Tuesday, December 16, 2008

Grandma’s All-Occasion Sugar Cookies

I have never considered making sugar cookies from scratch. Mostly, I think that is due to the fact that I have always considered sugar cookies to be a little bit beneath me simple. To be blunt, they never seemed challenging enough to bother with.

IMG_0747

But I really think that I was wrong on that point. With all of the cooking I have been doing lately, I have come to appreciate the some simpler flavors.

IMG_0772

These cookies turned out to be really fun. The cookie was light and tasted richly of sugar and butter. And they definitely aren't as simple as they seem. There is an art to making a truly fabulous sugar cookie.

Monday, December 15, 2008

Chocolate Crinkles

Chocolate Crinkles

I saw a picture of these cookies in a magazine last year and immediately thought, "Why don't I ever make something that looks as cute as those do."

So I cut out the recipe and planned to bake this recipe the next time I made a large batch of cookies.

Yummy chocolate!

So, over the past few weeks as I have been planning out my holiday baking, this recipe was always at the forefront of my mind. On Saturday, I readied my ingredients and pre-heated the oven. I flipped through my recipe collection only to find...well, nothing actually.

I had been thinking about this recipe for months. I had been planning on making this recipe for weeks. And I had never even bothered to look for it!

It looks just like a donut!

ARGH!

Fortunately, when one finds oneself in these kinds of situations, the internet is a lovely tool. I quickly found a substitute recipe that turned out to be just as delightful as I had been hoping.

I finally feel like I managed to make cookies that look as wonderful as they taste!

Lined up like little soldiers

Chocolate Crinkles

8 ounces bittersweet chocolate, melted
1 3/4 cups all-purpose flour
1/2 cup cocoa powder
2 teaspoons baking powder
1/4 teaspoon salt
1/4 cup (1 stick) butter, room temperature
1 1/3 cups brown sugar, firmly packed
2 large eggs
1 teaspoon vanilla extract
1/3 cup milk
1 cup powdered sugar for rolling
1 cup granulated sugar for rolling

Put the chocolate in a glass bowl and put it in the microwave. Warm for 30 seconds at a time until chocolate has melted. Set bowl aside to cool (but not harden!) until needed.

Sift together flour, cocoa, baking powder, and salt. Using a mixer, cream the butter and brown sugar together until they are well combined. Add eggs and vanilla and beat until fluffy, around 2 minutes. Add the cooled melted chocolate and mix to combine well. With mixer on low speed, alternate adding dry ingredients and milk until just combined, about a third at a time.

The dough should be pretty thick and heavy now. Leave it in the bowl, cover it with plastic wrap and pop it into the refrigerator overnight preferably, but at least several hours until firm.

When ready to back, preheat the oven to 350°F. Remove the dough when it is properly chilled and using either a tablespoon cookie scoop or just a normal tablespoon shovel up heaping tablespoons of dough and then roll them in your hands to create a ball (about ¾ the size of a ping pong ball). Drop it into a bowl of granulated sugar and roll it around to cover it then transfer it to a bowl of powdered sugar and roll it around again. If the dough becomes too warm, recover and return to the refrigerator for 20 minutes, or until chilled.

Once the dough balls have been rolled in the sugars, place them on a parchment or a silpat lined baking sheet, spacing each cookie about 1.5 inches apart. Bake for about 11-15 minutes. Remove from the oven and let them rest for about 5 minutes, then transfer them to a wire rack to cool.

Enjoy!

(source What Geeks Eat)


Wednesday, December 10, 2008

Quince Caramel Candies

Every since I started actively reading food blogs a few months ago, I have heard several reverential references to a fruit called quinces. Prior to this, I had never heard of this mystical food, and I certainly didn’t know where to buy any. During my regular trips to stores and markets, I had kept my eyes peeled for any of these little fruits, but had eventually resigned myself to the fact that I had missed the quince season.

IMG_0674

Until this past weekend when I spotted a lone box of them at a stand at my local farmers market. I was thrilled and quickly asked the person worker there how to pick out the best fruit. (FYI, telling someone to pick a yellow one is not helpful when the entire box is full of a yellow fruit that you have not seen before.) I selected a bag of the precious fruit and was happily on my way.

Except for one thing – I had no idea what I was going to do with them. I had always assumed that I wouldn’t be able to find them, so I didn’t have the slightest idea what to do with them. Until I came across Chez Pim's web site.

IMG_0726

I love caramel desserts. While some people are chocoholics to the core, I will never turn down anything that has caramel in it.

That combined with the fact that I am still in the planning stages of the Great Holiday Bake of 2008, made this a perfect choice for my new quinces.IMG_0714

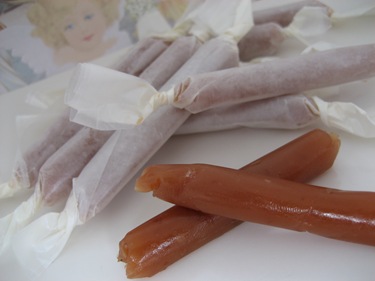
The best part is that they turned out to be just as wonderful as Chez Pim said they were. In fact, they are all wrapped up and sitting in my fridge right now, calling out to me, making it sooo hard to give them away to other people…

Quince Caramel Candies

(makes about 50 caramels)

2 lbs of quince

1 ½ cups water

3 cups sugar

½ cup salted butter, warmed to room temperature.


In a pot set over medium high heat, add the sugar and water and let cook until the sugar crystals are completely melted. Remove from heat. This can be done first to allow the quinces to be dropped into the pot, as soon as they are peeled and sliced.

Peel, core, and cut the quinces into quarters. Drop the fruits into the pot of syrup as you go along.

When you are done with the fruits, set the pot back on the stove. Bring the simple syrup to a boil, reduce the heat to a simmer, and let cook until the quince slices are soft and cooked through. The slices will be a soft pink color.

Remove the pot from heat and let cool on the countertop. When you are ready to make your caramels, use a slotted spoon to fish out the poached quinces from the syrup. Strain the syrup into a deep pot.

Set the pot with the syrup back on the stove, on high heat. Stick your candy thermometer into the pot. Cook the caramel over high heat until it reaches 240-250F (115-120C). Turn the heat off, then stir in the butter, a small knob at a time, until all the butter is incorporated into the caramel. Turn the heat back on, continue to cook over high heat, stirring occasionally, until the thermometer register 260F or 125C. Remove from heat immediately and set the pot aside to cool for a few minutes.

When the content of the pot stops bubbling and seems a bit safer to approach, pour it onto a cookie sheet lined with parchment paper (not waxed paper, just regular parchment.) Let stand until cool enough to handle. If you want to cut the caramels into squares and wrap them that way, you can wait until the caramel is completely cooled. If you want to roll and wrap them, that needs to be done before the caramel is completely cool.

(source Chez Pim)

Saturday, December 6, 2008

Pumpkin Swirl Brownies

IMG_0151

There are two things that happen during the fall that truly let me know that the season has changed. Because I live in Northern California , the weather can often stay quite pleasant all the way through November (just like it did this year), so I look to non-weather related events to clue me in to the arrival of fall.

IMG_0155

The first true indicator of fall to me, are seeing tomato trucks. When tomato season hits, I see dozens of trucks a day hauling their produce off to feed the world. Bouncing down the highways, they drop members of their precious cargo on the side of the road, adding a splash of vibrant color to the landscape. This sight always reminds me of the first time I saw them, when I was moving into the dorms my freshman year of college.

IMG_0170

The second sight that screams fall to me are pumpkins. I love baking with pumpkin, the end result is always so rich and moist. And these brownies are no exception.

The chocolate and the pumpkin pair up wonderfully, in these sweet fall treats.

Pumpkin-Swirl Brownies
8 tablespoons (1 stick) unsalted butter, plus more for pan
6 ounces bittersweet chocolate, chopped
2 cups all-purpose flour
1 teaspoon baking powder
1/8 teaspoon cayenne pepper
1/2 teaspoon salt
1 1/2 to 3/4 cups sugar (the original recipe calls for the larger amount; I think it could be dialed down a bit)
4 large eggs
1 tablespoon pure vanilla extract
1 1/4 cups solid-pack pumpkin
1/4 cup vegetable oil
1 teaspoon ground cinnamon
1/4 teaspoon ground nutmeg
1/2 cup chopped hazelnuts or other nuts (optional)

1. Preheat oven to 350 degrees. Butter a 9-inch square baking pan or dish. Cut a length of parchment that will cover the bottom and two sides (makes it much easier to remove), and line the pan with it. Butter the lining as well. (Just like Deb from Smitten Kitchen, I used an 8-inch square, because it was what I had. It works, too, but the brownies are crazy thick and take much longer to bake, just to give you a heads-up.)

2. Melt chocolate and butter in a heatproof bowl set over a pan of simmering water, stirring occasionally until smooth.

3. Whisk together flour, baking powder, cayenne, and salt in a large bowl; set aside. Put sugar, eggs, and vanilla in the bowl of an electric mixer fitted with the paddle attachment; beat until fluffy and well combined, 3 to 5 minutes. Beat in flour mixture.

4. Pour half of batter (about two cups) into a separate bowl and stir chocolate mixture into it. If you find that it is a little thick (as mine was) add a little more batter (a few tablespoons or so) until it is more pourable. This is important because mine was quite thick, and the pumpkin half was quite thin, so I had trouble swirling the two together.

5. In other bowl, stir in the pumpkin, oil, cinnamon, and nutmeg. Transfer half of chocolate batter to prepared pan smoothing top with a rubber spatula. Top with half of pumpkin batter. Repeat to make one more chocolate layer and one more pumpkin layer. Work quickly so batters don’t set.

6. With a small spatula or a table knife, gently swirl the two batters to create a marbled effect. Be sure to get your knife all the way to the bottom of the pan–I didn’t, and ended up with a chocolate base, not that it is such a bad thing. Sprinkle with nuts, if using.

7. Bake until set, 40 to 45 minutes. Let cool in pan on a wire rack. Cut into 16 squares.

(source Smitten Kitchen)

Wednesday, December 3, 2008

Pancetta and Parmesan Tacos

Clearly, I love to cook. I really enjoy trying out new recipes and playing with new ingredients. Sometimes though, the choices can be overwhelming. There are so many good looking recipes out there. I have a book that I glue all of my recipe clippings into, which currently contains over a hundred items just waiting for me to try, the foodie blog world provides me with more inspiration than I can handle, and let’s not even discuss all of the cookbooks sitting on my shelves. Needless to say, it can be very hard to narrow the choices down to one for a weeknight dinner.

IMG_0579

Often, I ask Diesel what he would like me to make, and his standard response is, “I don’t care, I love everything you cook.” As much as I appreciate his sentiment, that answer is endlessly frustrating. Also, the answer is not entirely true as we both vividly remember the dinner-that-shall-not-be-named.

IMG_0586

So when Diesel emailed me a shopping list the other day and included the instructions to pick up whatever we didn’t have at home, I was thrilled. I didn’t know what he had in mind, but the fact that he made the decision for me was wonderful.

It is no secret that Diesel and I are big fans of Guy Fieri, so when I discovered that Diesel had chosen two dishes from Guy’s Big Bite I was really excited to try them out. (As a warning – the recipes for dishes made on Guy’s Big Bite are posted on the Food Network web site, but they are wrong. Very, very wrong. Take them with a grain of salt and pay attention to instructions that are not logical. Despite the instructions, placing a roast in the oven for 15 minutes will not cook it all the way through. Not even close. Diesel actually wrote down the ingredients and instructions as Guy gave them on his show, so we would have a more accurate guideline for making the dish.)

These Pancetta and Parmesan Tacos turned out beautifully. I had never cooked with pancetta like this before and it was just delightful. It tasted a lot like bacon, but was richer, spicier and had a deeper flavor. Can't go wrong with that. I will definitely be making these again in the future.

Pancetta and Parmesan Tacos

1 cup grated Parmigiano-Reggiano
1 teaspoon paprika
1 teaspoon freshly black pepper, plus more for seasoning
1/2 cup chopped pancetta
1 cup diced Roma tomatoes
2 tablespoons julienne fresh basil leaves
Salt
2 tablespoons extra-virgin olive oil

Directions:
Preheat oven to 350 degrees F.

In a large bowl combine Parmesan, paprika, and freshly ground black pepper.

On a parchment lined cookie sheet, add the Parmesan mixture in 2 very thin tablespoon dots, 2 inches apart. Place in preheated oven and cook until cheese melts, about 4-5 minutes.

Remove from oven and when cheese is cool enough to handle but still moldable, remove and form into small taco type shells by laying the cheese over something round (a dowel or small rolling pin would work).

In a small sauté pan cook pancetta until crispy, remove and let cool. When cool, crumble with your hands.

In a small bowl add tomatoes, basil, salt, freshly ground black pepper, olive oil, and toss gently to combine.

Add tomato mixture to parmesan tacos and top with pancetta. Serve immediately.

Tuesday, December 2, 2008

Mark Bittman's No Knead Bread

I just made Mark Bittman's No Knead bread. I realize that I am two years late in jumping on this bandwagon, but man, it is better late than never.

IMG_0652

This bread is good.

The crust is crispy, but not overly hard. And the inside is light an fluffy. I can definitly understand the obsession that this recipe became when it was first published.

IMG_0651

It may not be the prettiest thing I have ever seen, but it was so easy, I am really excited to try my hand at more bread recipes.

Mark Bittman's No-Knead Bread

3 cups all-purpose or bread flour, more for dusting
¼ teaspoon instant yeast
1¼ teaspoons salt
Cornmeal or wheat bran as needed.

1. In a large bowl combine flour, yeast and salt. Add 1 5/8 cups water, and stir until blended; dough will be shaggy and sticky. Cover bowl with plastic wrap. Let dough rest at least 12 hours, preferably about 18, at warm room temperature, about 70 degrees.

2. Dough is ready when its surface is dotted with bubbles. Lightly flour a work surface and place dough on it; sprinkle it with a little more flour and fold it over on itself once or twice. Cover loosely with plastic wrap and let rest about 15 minutes.

3. Using just enough flour to keep dough from sticking to work surface or to your fingers, gently and quickly shape dough into a ball. Generously coat a cotton towel (not terry cloth) with flour, wheat bran or cornmeal; put dough seam side down on towel and dust with more flour, bran or cornmeal. Cover with another cotton towel and let rise for about 2 hours. When it is ready, dough will be more than double in size and will not readily spring back when poked with a finger.

4. At least a half-hour before dough is ready, heat oven to 450 degrees. Put a 6- to 8-quart heavy covered pot (cast iron, enamel, Pyrex or ceramic) in oven as it heats. When dough is ready, carefully remove pot from oven. Slide your hand under towel and turn dough over into pot, seam side up; it may look like a mess, but that is O.K. Shake pan once or twice if dough is unevenly distributed; it will straighten out as it bakes. Cover with lid and bake 30 minutes, then remove lid and bake another 15 to 30 minutes, until loaf is beautifully browned. Cool on a rack.

Yield: One 1½-pound loaf.

(Source The New York Times)

Related Posts Plugin for WordPress, Blogger...