Labels

Showing posts with label Fodder. Show all posts

Saturday, October 9, 2010

A Night at The Kitchen

Diesel took me to The Kitchen for my birthday and it was hands down one of the best meals of my life.  Combine the food with the attitude that "there are no rules" and it becomes a night to remember.  Want seconds or thirds of a dish?  Just ask.   Want to wander through the kitchen, walk in fridge and wine cellar?  Go for it. 

I only have one thing to say - This place is awesome.

Now I just need to start saving my pennies so I can go back.
DSC_0058
DSC_0064
DSC_0070
DSC_0066
DSC_0072
DSC_0090
DSC_0093
First Course - ‘Thai Style’ Coconut Milk Soup with Wild Frog Legs, Mushrooms, Bamboo Rice and Cabbage Slaw
DSC_0101
DSC_0103
Second Course -  A ‘Burrito’ of Wagyu Beef Ribeye, Eggplant and Goat Cheese with an Herbed Crayfish Salad and Tomato-Corn Butter
DSC_0106
Freshly grated wasabi
DSC_0114
Sushi Course
DSC_0120
DSC_0130
DSC_0127
Third Course - Maine Lobster Bolognese and Tempura Egg Yolk with Butter Poached Black Truffle Pasta and Red Wine-Parmesan Broth
DSC_0133
DSC_0138
Fourth Course - The Kitchen’s Steak Diane with Puff Pastry, Potato, Small Carrots, Onions and Homemade Bacon
DSC_0156
White glove tea service
DSC_0150
DSC_0158
Dessert Course - Brioche French Toast and Apple Consommé with Pink Lady Apple Fries, Tahitian Vanilla Ice Cream and Maple Sabayon

Thursday, September 30, 2010

Batter Blaster

I love my boyfriend.


Sometimes we watch weird commercials on late night tv and talk about how bizarre certain organic, canned, pancake batter products are.


Then one day he brings home this.


He's the best.


Monday, September 13, 2010

Monster Cookie

Growing up, every time I walked past the cookie stand in Del Amo mall, I lusted after the enormous, pizza sized chocolate chip cookies they sold. “How cool would it be", I wondered, “to have one of those for my next birthday?”

But unfortunately the attention span of a child is akin to that of a goldfish, and my birthday would come and go with the giant cookies present only as a distant memory.

Flash forward almost twenty years and Diesel's mother had entrusted me with the awesome responsibility of contributing the cake for Diesel’s 33rd birthday party. Nervous to impress, I asked him what kind of cake he wanted for his birthday. “I don’t like cake,” was his only reply.

How was I to impress his family with the centerpiece of the birthday meal if he didn’t want cake?? Didn’t he know that I needed him to have a preference for the traditional dessert I was expected to provide??


And then I thought of cookies. Iced cookies, chocolate cookies, ice cream sandwich cookies – all of which would probably satisfy the peculiarly picky sweet tooth of my aging boyfriend, but none that packed the WOW factor I was hoping to deliver.


And then it came to me. What I really needed was one of the man-hole sized cookies from my childhood.

I ended up making two cast iron skillet sized cookies, instead of the monstrosity of my day dreams, but the end result was no less impressive. I served one cooled and frosted with the traditional birthday message, and one hot and melty - straight out of the oven, just the way he likes it. Accompanied by vanilla and homemade cheesecake ice cream, the dessert set a delicious tone for an exciting new year.

** My icing job did not do this cookie justice. Luckily, it didn't effect the taste.


Monster Cookie
(courtesy of the queen, Martha Stewart)
12 servings

• 2 cups all-purpose flour
• 1 teaspoon baking soda
• 1/2 teaspoon salt
• 3/4 cup unsalted butter, softened
• 1/2 cup sugar
• 3/4 cup packed light-brown sugar
• 1 large egg
• 2 teaspoons pure vanilla extract
• 1 bag (12 ounces) semisweet chocolate chips

1. Preheat the oven to 350 degrees. In a medium bowl, whisk together flour, baking soda, and salt; set aside. In an electric mixer fitted with the paddle attachment, cream butter and sugars together until mixture lightens and becomes fluffy, about 2-3 minutes. Add the egg and vanilla and mix until they they have become fully incorporated into the butter mixture. Add flour mixture, and beat until just combined. Stir in chocolate chips.

2. Transfer dough to a 10-inch ovenproof skillet, and press to flatten, evenly covering the bottom of the skillet. Bake until edges are brown and top is golden, 35 to 40 minutes. Don't overbake; it will continue to cook a few minutes out of the oven. Transfer to a wire rack to cool, 15 to 20 minutes. Cut into 12 wedges. Serve warm for the yummiest effect.

Wednesday, June 23, 2010

Downtown Bakery and Creamery's Doughnut Muffins

Yum.

Maybe double yum.

Not only are these amazing, but they might even be better than the originals.

I watch food network alot, and I always take notes when I see them feature restaurants or bakeries in my area. So when I went to Napa a few weeks ago, I knew I had to take a sidetrip to Healdsburg to check these babies out. And they were good.

So good in fact, that I decided to make them the next weekend for a road trip we were taking with friends. Not only were they gobbled up, but Diesel told me they are better than the first ones we tried.

And you know what? I agree.


Doughnut Muffins
For the muffins:
12 oz. (24 Tbs.) unsalted butter, warmed to room temperature
1-3/4 cups sugar
4 large eggs
1 lb. 11 oz. (6 cups) all-purpose flour
1 Tbs. plus 2 tsp. baking powder
1/2 tsp. baking soda
1-3/4 tsp. salt
1 tsp. ground nutmeg
1-2/3 cups milk
1/4 cup buttermilk
1 1/2 teaspoons vanilla extract

For the topping:
8 oz. (16 Tbs.) unsalted butter; more as needed
2 cups sugar
2 Tbs. ground cinnamon


To make the muffins:
Put a rack in the middle of the oven and heat the oven to 350°F.
In a stand mixer or a large bowl, cream the butter and sugar for 5 mins, until lighter in color and sugar particles are not obvious.
Beat in the eggs, one at a time, until just mixed in.
Sift together the flour, baking powder, baking soda, salt, and nutmeg. Combine the milk, buttermilk and vanilla extract.

With a wooden spoon, mix a quarter of the dry ingredients into the butter mixture. Then mix in a third of the milk mixture. Continue mixing in the remaining dry and wet ingredients alternately, ending with the dry. Mix until well combined and smooth, but don't overmix.
Grease and flour a standard-size muffin tin. Scoop enough batter into each tin so that the top of the batter is even with the rim of the cup, about 1/2 cup. (An ice-cream scoop gives you the perfect amount.)
Bake the muffins until firm to the touch, 30 to 35 min.


To Finish:
Melt the butter for the dipping mixture. Combine the sugar and cinnamon.
When the muffins are just cool enough to handle, remove them from the tin, dip them into or brush them all over with the melted butter, and then roll them in the cinnamon sugar.

Make Ahead Tips:
You don't have to bake all the muffins right away; the batter will keep, covered and chilled, for up to three days in the refrigerator.

Thursday, June 3, 2010

Leite’s Consummate Chocolate Chip Cookies

Leite’s Consummate Chocolate Chip Cookies
Adapted from David Leite via The New York Times

Yield: 1 1/2 dozen 5-inch cookies.

2 cups minus 2 tablespoons(8 1/2 ounces) cake flour
1 2/3 cups (8 1/2 ounces) bread flour
1 1/4 teaspoons baking soda
1 1/2 teaspoons baking powder
1 1/2 teaspoons coarse salt
2 1/2 sticks (1 1/4 cups) unsalted butter
1 1/4 cups (10 ounces) light brown sugar
1 cup plus 2 tablespoons (8 ounces) granulated sugar
2 large eggs
2 teaspoons natural vanilla extract
1 1/4 pounds bittersweet chocolate disks or fèves, at least 60 percent cacao content
Sea salt

1. Sift flours, baking soda, baking powder and salt into a bowl. Set aside.

2. Using a mixer fitted with paddle attachment, cream butter and sugars together until very light, about 5 minutes. Add eggs, one at a time, mixing well after each addition. Stir in the vanilla. Reduce speed to low, add dry ingredients and mix until just combined, 5 to 10 seconds. Drop chocolate pieces in and try to incorporate them without breaking them. Press plastic wrap against dough and refrigerate for 24 to 36 hours. [Dough may be used in batches, and can be refrigerated for up to 72 hours.]

3. When ready to bake, preheat oven to 350 degrees. Line a baking sheet with parchment paper or a nonstick baking mat. Set aside.

4. Scoop 6 3 1/2-ounce mounds of dough (the size of generous golf balls) onto baking sheet, making sure to turn horizontally any chocolate pieces that are poking up; it will make for a more attractive cookie. Sprinkle lightly with sea salt and bake until golden brown but still soft, 18 to 20 minutes. Transfer sheet to a wire rack for 10 minutes, then slip cookies onto another rack to cool a bit more. Repeat with remaining dough, or reserve dough, refrigerated, for baking remaining batches the next day. Eat warm, with a big napkin.

* I found Valrhona’s fèves or oval-shaped chocolate pieces, at Whole Foods in half pounds. Baking discs can be found from a number of brands, from Jacques Torres to E. Guittard (Fresh Direct used to sell these by the quarter pound, but now just in one pound boxes, but still at a very reasonable price) to Ghiradelli. Can’t find them? Use the largest chocolate chips you can find. Ghiradelli sells some slighly larger ones in the brown bag (as opposed to the standard-sized chips in the gold bag) though I may have mixed the two varieties up. It wouldn’t be the first time.

Wednesday, May 5, 2010

Tres Leches Cake = YUMMY

I was a little skeptical about a wet cake, but this cake is fantastic. It makes an awesome addition to any potluck or Cinco de Mayo party.


Tres Leches Cake
Prep Time: 45 Minutes
Cook Time: 1 Hour
Servings: 12

Ingredients
• 1 cup All-purpose Flour
• 1-½ teaspoon Baking Powder
• ¼ teaspoons Salt
• 5 whole Eggs
• 1 cup Sugar, Divided
• 1 teaspoon Vanilla
• ⅓ cups Milk
• 1 can Evaporated Milk
• 1 can Sweetened, Condensed Milk
• ¼ cups Heavy Cream

For the icing:
• 1 pint Heavy Cream, For Whipping
• 3 Tablespoons Sugar

Preparation Instructions

Preheat oven to 350 degrees. Spray a 9 x 13 inch pan liberally until coated.

Combine flour, baking powder, and salt in a large bowl. Separate eggs.
Beat egg yolks with 3/4 cup sugar on high speed until yolks are pale yellow. Stir in milk and vanilla. Pour egg yolk mixture over the flour mixture and stir very gently until combined.
Beat egg whites on high speed until soft peaks form. With the mixer on, pour in remaining 1/4 cup sugar and beat until egg whites are stiff but not dry.
Fold egg white mixture into the batter very gently until just combined. Pour into prepared pan and spread to even out the surface.
Bake for 35 to 45 minutes or until a toothpick comes out clean. Turn cake out onto a rimmed platter and allow to cool.
Combine condensed milk, evaporated milk, and heavy cream in a small pitcher. When cake is cool, pierce the surface with a fork several times. Slowly drizzle all but about 1 cup of the milk mixture—try to get as much around the edges of the cake as you can.
Allow the cake to absorb the milk mixture for 30 minutes. To ice the cake, whip 1 pint heavy cream with 3 tablespoons of sugar until thick and spreadable.

Spread over the surface of the cake. Decorate cake with whole or chopped maraschino cherries. Cut into squares and serve.

Friday, April 30, 2010

Mini Raspberry Tarts


Raspberry Tarts
makes 24 muffin-size tarts (with some leftover filling) or 2 full-size pies

2 refrigerated pie crusts (the kind that come rolled up in a box, not already pressed into a pan)
1 packet gelatin
3 small lemons, juiced (about 1/2 cup)
1 teaspoon lemon zest
2 cans sweetened condensed milk
1 (10-ounce) package frozen raspberries, thawed but not drained
fresh raspberries to garnish

Preheat the oven to 450 degrees. Lightly spray a muffin tin with cooking spray.
Working with one pie crust at a time, unroll it, and use a 3-inch biscuit cutter to cut 12 circles.
Take each circle of dough and roll it gently with a rolling pin until it's just a bit bigger and thinner, so that it will fill a muffin cup. When you press the dough into the muffin tin, the top of the dough should reach the top of the cup with rippled edges.
Bake the tart shells for 10 minutes, until golden brown. Let cool.

In a large bowl, dissolve the gelatin in the lemon juice and stir. Whisk in the lemon zest and condensed milk.
Add the raspberries and their juices. Stir well to combine. (You can use a hand-held mixer to make the filling extra smooth, if you'd like.)
Fill the baked, cooled tart shells with a few spoonfuls of the raspberry mixture, or divide the filling between the two pie crusts.
Cover with plastic wrap and chill until firm.
Garnish with fresh raspberries or whipped cream.


*Note: The filling also makes a good trifle, by the way, layered with whipped cream.

Monday, February 2, 2009

World Peace Cookies

UC Davis colors.  Go Ags!

These cookies are good. Seriously good. Don't let their looks fool you. These cookies turned out so well that I decided to send them to my little brother as part of a care package. I gave them up for him. I hope he can appreciate that.

MMmmmm....

I made these cookie for Tuesday's with Dorie this week, and I am so glad I did. I skipped a couple of recipes last month, and I wasn't entirely sure about these cookies. I'm not normally a huge fan of chocolate cookies (except for these of course), but these sure hit the spot.

Aren't they cute in their box!

In fact, I've already decided that my soldier is getting these next month. Lucky boy!

Sunday, February 1, 2009

Super Bowl Sugar Cookies with Royal Icing

IMG_1341

I have been playing around with royal icing for the last few days because I have been determined to make cute cookies for the super bowl. When I was in Portland, I came across a cooking store that was selling their cookie cutters for 50 cents apiece. I was able to pick up a football shaped one and a helmet shaped one for a dollar. Which is what sparked this idea.

I had heard that using royal icing was difficult, so rather than screwing up my cookies for the party, I thought I would do a test run earlier in the week with cookies that I had picked up from the supermarket. I stuck with white frosting because hey, the simpler for my first time, the better.

First Royal Icing Attempt

The cookies turned out better than expected, but not as well as I had hoped. The centers had pooled fairly well and had dried relatively smooth and matte. However, the piped edges were lumpy and hardly up to my standards. On the up side however, I managed not to leave any gaps which might have allowed frosting to escape after in floods the center of the cookie. So really, things could have been worse.

IMG_1346

I felt much better prepared to ice the football themed cookies on Saturday. The royal icing was still difficult to work with, though I had read up more on royal icing and thought about my approach for the second batch of iced cookies. Over all though, I felt much more comfortable by the time I was finished with the football cookies.

This was partially because of how much more difficult these were than the first batch. The had lots of edges, a multitude of colors and the footballs even had laces piped on top of them! I am happy with how smooth and perfect the centers turned out to be, but I am still working on piping the outlines more consistently. The cookies turned out so cute though, that I am sure I will be making these again soon with a different theme. My only problem with these cookies is that as adorable as they look, they only taste ok. I'm not sure if making the royal icing with egg whites instead of meringue powder was make the taste more to my liking, but I may try that next time.

IMG_1338

For the sugar cookies
1 lb unsalted butter, at room temperature
3 cups granulated sugar
2 large eggs
1 tsp pure vanilla extract
1½ tsp salt
5 cups all-purpose flour, plus more for dusting

In the bowl of an electric mixer fitted with the paddle attachment, beat butter and sugar on medium-high speed until light and fluffy, about 5 minutes. Add eggs, vanilla, and salt; mix on medium-high speed until combined. With mixer on low speed, add flour in two batches, mixing until just incorporated.

Turn out dough onto a clean work surface. Divide in half, and pat into flattened rectangles; wrap each in plastic. Refrigerate for at least 2 hours or up to 1 week.

Preheat oven to 350°F., with rack in upper and lower thirds. Line large baking sheets with parchment paper. On a lightly floured work surface, roll out one rectangle of dough to a scant ¼-inch thickness. Using cookie cutters, cut out shapes. Using a small offset spatula, transfer shapes to prepared sheets, placing about 2 inches apart. Chill in freezer or refrigerator until firm, about 15 minutes. Set scraps aside. Repeat process with remaining rectangle of dough. Gather all the scraps, and roll out again. Chill 15 minutes; cut out more shapes, and place on sheets.

(source Martha Stewart)


For the royal icing
4 cups powdered sugar
3 tbsp meringue powder
5 tbsp water

Once the cookies have cooled, pipe the outline of each cookie. Then add a few teaspoons of water to the remaining frosting until it is of a pourable consistency, but is not too thin. The trick is to add the water a teaspoon at a time and check it by pouring a spoonful of icing back into the bowl. If it melds into the rest of the icing in about 10 seconds, it's thin enough.

Next pipe the thinned icing inside the outlines using a plastic bag with one corner snipped off. Use a toothpick to smooth it out the edges and drag the frosting to the edge and into all crevices. Don't worry if the surface doesn't look smooth at first. It smoothes out as it dries.

If desired, once the icing has dried, additional designs can be piped on top with the thicker version of the icing.

(source Jackie's Cooking Adventures)

Saturday, January 31, 2009

Shredded Chicken Tacos

Last week before Diesel and I were leaving to go on our vacation to Portland (by the way, did you know that it snows in Portland ?!?) I wanted to make something simple that would not dirty up too many dishes, but would still use up some of the extra ingredients that I had on hand. I came across this recipe for shredded chicken tacos and I was really excited since I had never made chicken tacos before.

This recipe is so simple; the most time consuming part is shredding the chicken. I shouldn’t have been surprised though since Mark Bittman’s No-Knead Bread, was just as easy and scrumptious as these tacos were.IMG_1240

Shredded Chicken Tacos
2 boneless chicken breasts
1 large white onion, peeled and quartered
5 cloves garlic, peeled and lightly crushed
2 bay leaves
1 tablespoon ground cumin
1 dried ancho chili pepper
Salt and pepper to taste
1 tsp cornstarch
1 tbsp cold water

Combine all ingredients in a saucepan and add water to cover. Turn heat to high, bring to a boil. Partially cover and adjust heat so mixture simmers steadily. Cook until meat is very tender, about 30 minutes. Remove from liquid and cool. Shred meat with fingers.

If desired, discard solids from pan, reserving the juices. Set heat to medium, and bring the sauce to a simmer. Let cook for several minutes until the sauce has reduced in volume. Mix corn starch with the water until well mixed and smooth. Add to juice to help thicken. Serve sauce drizzled over meat on the tacos.

**These tacos make a perfect pair with this Mexican rice.

(source Mark Bittman for the New York Times)

Tuesday, January 20, 2009

Clementine Poppy Seed Muffins

Diesel and I spend a lot of time in our kitchen. Luckily, even though we share a one bedroom apartment, we have a decently sized kitchen that can accommodate two people at work at once. When cooking together, our roles are fairly well defined. Diesel takes care of all of the barbecuing, bread making and skillet potatoes. I am in charge of everything else.

clemintines

One day while Diesel was sleeping, I decided to make his famous potatoes to accompany dinner. I'd seen him make this dish a dozen times, and figured that I would be able to whip them up without any problems. I couldn’t have been more wrong.

Midway through the cooking process, I realized that the potatoes did not have the correct red tinge from the seasonings. Figuring I had failed to be appropriately generous with the seasoning, I added more paprika. Then a little bit more. And a generous sprinkle after that. Then a touch more. Yet, I still had not achieved the correct hue. But, not one to be deterred, I soldiered on.

Waiting to be baked

I realized I had made a horrible mistake when I finally tasted the potatoes. Normally, I taste my dishes at every step of the process, but these raw potatoes were just not appealing. It turns out that Diesel uses seasoning salt and cayenne pepper. Not paprika. I wasn't even close to being on the right track. Diesel has been laughing at me for weeks.

My seasoning mistakes aside, Diesel and I have very different approaches to cooking. I will follow a recipe, but if it suits me and the items I have on hand, I will make substitutions, additions or deletions of ingredients. Diesel however, maintains a strict adherence to every word of any given recipe. So much so, that when he baked his first loaf of bread and the recipe instructed that the loaf be “sprinkled liberally with flour”, that is exactly what he did. Covering the dough in approximately half an inch of loose flour, which promptly burnt in the oven.

batter

I am trying to teach him to take the instructions with a grain of salt (no pun intended), but contrary to the rest of his life, it is difficult for him to put common sense before all else in the kitchen. He just doesn't trust his instincts yet.

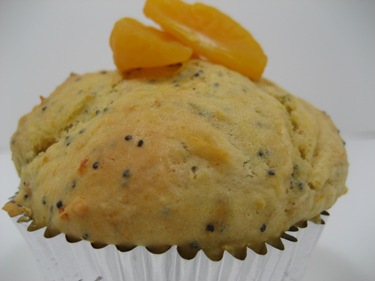
Take this recipe for instance. When I told him that I had been inspired by Nigella Lawson's Clementine Cake recipe, but that I didn't want to make another sweet treat - he was baffled that I was going to create a muffin recipe out of it. It made no sense to him that I could just come up with a recipe without a strict script to follow. Far be it for me to claim that all of my recipes work, much less turn out fantastic, but this one sure did. The muffins turned out moist and had a wonderful citrus undertone. These are just the thing to go with my warm coffee on a chilly winter morning.

IMG_1205

Clementine Poppy Seed Muffins
makes 12 muffins

3 cups unbleached all-purpose flour
1 tablespoon baking powder
½ teaspoon baking soda
3 tablespoons poppy seeds
½ teaspoon table salt
10 tablespoons unsalted butter , softened
1 cup granulated sugar , less 1 tablespoon
1 tablespoon grated lemon zest
2 large eggs
1 ½ cups plain low-fat yogurt
Vegetable cooking spray or additional unsalted butter for muffin tins
4 to 5 clementines (about 375grams/slightly less than 1 pound total weight)

Put the clementines in a pot with cold water to cover, bring to the boil, and cook for 2 hours. Drain and, when cool, cut each clementine in half across the width and remove the seeds. Then puree the skins, pith, and fruit in the processor.

Adjust oven rack to lower middle position and heat oven to 375 degrees. Mix flour, baking powder, baking soda, poppy seeds, and salt in medium bowl; set aside.

Beat butter and sugar with electric mixer on medium-high speed until light and fluffy, about 2 minutes. Add lemon zest to butter-sugar mixture. Add eggs, one at a time, beating well after each addition. Beat in one-half of dry ingredients. Beat in one-third of yogurt. Beat in remaining dry ingredients in two batches, alternating with yogurt, until incorporated.

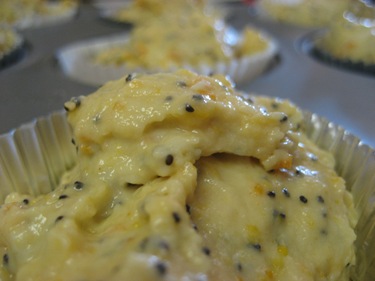
Spray twelve-cup muffin tin with vegetable cooking spray or coat lightly with butter. Use large ice cream scoop to divide batter evenly among cups. Bake until muffins are golden brown, 25 to 30 minutes. Set on wire rack to cool slightly, about 5 minutes. Remove muffins from tin and glaze.

(adapted from Smitten Kitchen and Cook's Illustrated)

Monday, January 19, 2009

Coq a la Biere (Chicken with Dark Beer)

Every once in a while, I make a dish that knocks my socks off. It turns out so terrifically that I am blown away. I want to open the window of my apartment yell to the world that they NEED to eat this. Their lives may just depend on it.

Because it is just so good! And I made it! And I want everyone to know what a good cook I am!

IMG_1064

But enough of my culinary insecurities. I just want to crawl into the warm, creamy sauce and take a nap. It is just that wonderfully comforting - even if you don't fantasize about sleeping in your food.

IMG_1063

Dishes like this I immediately want to make again. In fact, I may just make this again tonight. I do have some Newcastle left over...

Coq a la Biere
3 tablespoons all-purpose flour
1/2 teaspoon salt
1/4 teaspoon freshly ground black pepper
1 lb chicken thighs
2 tablespoons butter
1 tablespoon canola oil
3 tablespoons dry gin
3/4 cup chopped celery
3/4 cup chopped peeled carrot
1/2 cup chopped shallots (about 3 medium)
1/2 lb mushrooms, washed and quartered
3 sprigs fresh thyme
3 sprigs fresh flat-leaf parsley
1 bay leaf
1 cup dark beer ( I like Newcastle)
1/4 cup whole-milk Greek-style yogurt
2 teaspoons white wine vinegar
1 tablespoon chopped fresh flat-leaf parsley

Combine flour, salt and pepper in a re-sealable plastic bag. Toss the chicken into the bag and shake until chicken is evenly coated. Heat butter and oil in a large deep skillet over medium-high heat. Add chicken to pan; sauté 5 minutes on each side or until browned. Remove pan from heat. Pour sherry into one side of pan; return pan to heat. Ignite sherry with a long match; let flames die down. Remove chicken from pan and keep warm.

Add celery, carrot, shallots to pan. Sauté 5 minutes or until vegetables are tender, stirring occasionally. Add mushrooms. Place thyme, parsley, and bay leaf on a double layer of cheesecloth or a tea strainer. Add to pan. Stir in beer; bring to a simmer. Return chicken to pan, nestling into vegetable mixture. Cover, reduce heat, and simmer 45 minutes or until they are done.)

Remove cheesecloth bag or tea strainer. Remove chicken from pan and keep warm. Place pan over medium heat; stir in yogurt. Cook 1 minute or until thoroughly heated (do not boil, as the yogurt may curdle). Remove from heat; stir in vinegar. Taste and adjust seasoning, if desired. Serve chicken topped with vegetables and sauce. Sprinkle with chopped parsley.

(adapted from Cooking Light)

Tuesday, January 13, 2009

Savory Corn and Pepper Muffins

I have been on a quest for the ultimate cornbread recipe for a long time now. This has led me to try out plethora of recipes, and to have a sudden sinking feeling when I realized what this week's Tuesday's with Dorie recipe was.

Not. Another. Cornbread. Recipe.

IMG_1080

But, I reasoned, this was a different take on cornbread. I am normally not a fan of bread that is full of stuff, but I was willing to give this recipe a shot. For the sake of TWD, if nothing else.

And the results? These were ok. I decided to halve the recipe, but forgot to halve the jalapeno (oops), so they turned out a little hotter than I had anticipated.

IMG_1083

But I didn't end up as hung up on the veggies inside as I thought that I would. They were actually, gasp, good. They might not become a staple in my repertoire anytime soon, but I can see myself making these to accompany a soup or barbeque dish. And the cheddar cheese I sprinkled on top, crisped up nicely and was a perfect addition to this crumbly muffin.

IMG_1084

Monday, January 12, 2009

Mammy Barto's Faux-Fried Cauliflower

Over the last few months, as I have been cooking, I have been thinking a lot about the role that food plays in the world. I cannot think of many other acts that transcend the borders and ethnicities of the world in the way that the ritualistic nature of daily meals do.

IMG_1056

Across socioeconomic stratas and religious viewpoints we all eat (hopefully - though I am well aware of the fact that many people do not have the resources, access or ability to obtain food for some, if not all, of their meals). Food connects us to our neighbors, our enemies, our past and future, our family.

There are a handful of dishes that are universal on my mother's side of my family. All of them were made by my great-great-grandmother for her grandchildren, my grandmother has made them for me, and I have begun making them myself. Through the process of gathering the ingredients, cooking them and eating, I feel connected, a part of a tradition that is my own.

IMG_1057

I love making this dish, and the handful of others that remind me of my childhood, my family. It makes me inordinately happy to continue making the same dishes as other generations of my family have been making for decades.

"One of the very nicest things about life is the way we must regularly stop whatever it is we are doing and devote our attention to eating." ~Luciano Pavarotti and William Wright, Pavarotti, My Own Story

Mammy Barto's Cauliflower
1 small head cauliflower
2 tablespoons butter
3 tablespoons cracker crumbs (I like graham crackers, but almost anything would work)
Salt and pepper to taste

Wash head of cauliflower and steam to al dente. Cut the head into florets.

Melt the butter in a saucepan over medium heat. Add cracker crumbs and cook, while stirring, for 2 to 3 minutes, or until the crumbs have browned.

Add cauliflower, salt and pepper and mix on medium heat until well coated. Serve immediately.

Saturday, January 10, 2009

French Pear Tart

IMG_1007

I was very excited to make this French Pear Tart for Tuesdays with Dorie. The reason for my excitement was that this week's recipe was chosen by Dorie herself! I figured that if anyone was going to choose an awesome recipe, it would be her. After all, she literally wrote the book.

IMG_1045

This recipe also gave me an opportunity to break in my new tart pan that has been sitting, lonely, on the shelf for the past few months.

IMG_1028

I was extremely pleased with how this recipe turned out. I was very skeptical about how the almonds would pair with the pears, but it was fantastic. The tart turned out a lot lighter than some of the other recipes I have made with TWD, and was sweet without being cloying. This is definitely something that I will be making again.

Wednesday, January 7, 2009

Into the Unknown: Cherry Sweet & Sour Cornish Game Hens

I have actually been thinking a lot about my blog lately, but without really writing much. It's kind of funny, but when I started out I never really decided what direction I wanted it to go. I just wanted it to revolve around food. Finally, I decided that I would try to incorporate a new ingredient or a new technique into one recipe for my blog every month.

IMG_0967

My decision to continue developing my culinary skills begins this year with a fabulously fun recipe, Cherry Sweet & Sour Cornish Game Hens. This recipe was a perfect choice to kick off the year as it involved a new ingredient (the game hens) and a new technique (brining).

IMG_0969

This recipe even got me to cook on the barbeque, which is something that I never do because, well, Diesel always does it for me! The barbeque is his domain, and this was only the second time in the course of our relationship that I have attempted to use it. So, while he slept, I cooked. And I was so proud of myself. This dish turned out very well, the meat was juicy and the saucy tangy. I really could not have been happier with how this recipe turns out and I think it is a good sign for the upcoming year.

IMG_0967new

Game Hen Brine
6 cups cold water
2 tablespoons soy sauce
1 tablespoon sugar
1 tablespoon kosher salt
1 teaspoon ground ginger
1 teaspoon red wine vinegar

Mix everything together in a large metal or glass bowl. Add game hens, completely submerging (A plate can be placed on top of the birds to hold them in the mixture). Let brine for 6 - 8 hours or overnight.


Cherry Sweet & Sour Cornish Game Hens
1/2 teaspoon olive oil
1 clove garlic, minced
1 teaspoon fresh ginger, grated
1/2 cup cherry preserves
2 teaspoon soy sauce
1 tablespoon rice wine vinegar
1 tablespoon hot Chinese mustard
1/2 lemon, juiced
1 teaspoon garlic chili sauce
1 1/2 teaspoon honey
1/2 cup dried sour cherries
2 Cornish Game Hens

Heat the barbeque to medium-high heat.

Heat the olive oil over medium heat in a small saucepan. Add the garlic and ginger and cook until softened and fragrant. Turn the heat down to medium-low and add cherry preserves, soy sauce, vinegar, mustard, lemon juice, garlic chili sauce and honey. Stir and let simmer for about 5 minutes. Divide the sauce in half leaving one half in the saucepan.

Oil the grate of the grill & place the hens over direct heat breast side up. Cook with the cover closed for ten minutes. Brush the hens with the 1/2 of the glaze not in the saucepan. Close cover & continue to cook for another 10 - 20 minutes until the hens are fully cooked.

Remove the hens from the grill and allow to rest for 5 minutes. While the hens are resting, add the dried cherries to the remaining glaze in the saucepan. Turn the heat to medium-low and allow to simmer for about 3 minutes.

Serve the hens over the wild rice, drizzling both with the remaining glaze.

(source A Good Appetite)

Friday, January 2, 2009

Buttery Jam Cookies

IMG_0925

Today was a very good day. Not only did I get to make these fun (purple!) cookies, but I finally caved and bought myself a stand mixer. It is so fantastic. Yay!

new mixer!

It made short work of the thick dough for these cookies, which the blackberry jam had turned a pale shade of purple. They were quite cute.

IMG_0927

Related Posts Plugin for WordPress, Blogger...