Tuesday, January 13, 2009

Savory Corn and Pepper Muffins

I have been on a quest for the ultimate cornbread recipe for a long time now. This has led me to try out plethora of recipes, and to have a sudden sinking feeling when I realized what this week's Tuesday's with Dorie recipe was.

Not. Another. Cornbread. Recipe.

IMG_1080

But, I reasoned, this was a different take on cornbread. I am normally not a fan of bread that is full of stuff, but I was willing to give this recipe a shot. For the sake of TWD, if nothing else.

And the results? These were ok. I decided to halve the recipe, but forgot to halve the jalapeno (oops), so they turned out a little hotter than I had anticipated.

IMG_1083

But I didn't end up as hung up on the veggies inside as I thought that I would. They were actually, gasp, good. They might not become a staple in my repertoire anytime soon, but I can see myself making these to accompany a soup or barbeque dish. And the cheddar cheese I sprinkled on top, crisped up nicely and was a perfect addition to this crumbly muffin.

IMG_1084

Monday, January 12, 2009

Mammy Barto's Faux-Fried Cauliflower

Over the last few months, as I have been cooking, I have been thinking a lot about the role that food plays in the world. I cannot think of many other acts that transcend the borders and ethnicities of the world in the way that the ritualistic nature of daily meals do.

IMG_1056

Across socioeconomic stratas and religious viewpoints we all eat (hopefully - though I am well aware of the fact that many people do not have the resources, access or ability to obtain food for some, if not all, of their meals). Food connects us to our neighbors, our enemies, our past and future, our family.

There are a handful of dishes that are universal on my mother's side of my family. All of them were made by my great-great-grandmother for her grandchildren, my grandmother has made them for me, and I have begun making them myself. Through the process of gathering the ingredients, cooking them and eating, I feel connected, a part of a tradition that is my own.

IMG_1057

I love making this dish, and the handful of others that remind me of my childhood, my family. It makes me inordinately happy to continue making the same dishes as other generations of my family have been making for decades.

"One of the very nicest things about life is the way we must regularly stop whatever it is we are doing and devote our attention to eating." ~Luciano Pavarotti and William Wright, Pavarotti, My Own Story

Mammy Barto's Cauliflower
1 small head cauliflower
2 tablespoons butter
3 tablespoons cracker crumbs (I like graham crackers, but almost anything would work)
Salt and pepper to taste

Wash head of cauliflower and steam to al dente. Cut the head into florets.

Melt the butter in a saucepan over medium heat. Add cracker crumbs and cook, while stirring, for 2 to 3 minutes, or until the crumbs have browned.

Add cauliflower, salt and pepper and mix on medium heat until well coated. Serve immediately.

Saturday, January 10, 2009

French Pear Tart

IMG_1007

I was very excited to make this French Pear Tart for Tuesdays with Dorie. The reason for my excitement was that this week's recipe was chosen by Dorie herself! I figured that if anyone was going to choose an awesome recipe, it would be her. After all, she literally wrote the book.

IMG_1045

This recipe also gave me an opportunity to break in my new tart pan that has been sitting, lonely, on the shelf for the past few months.

IMG_1028

I was extremely pleased with how this recipe turned out. I was very skeptical about how the almonds would pair with the pears, but it was fantastic. The tart turned out a lot lighter than some of the other recipes I have made with TWD, and was sweet without being cloying. This is definitely something that I will be making again.

Wednesday, January 7, 2009

Into the Unknown: Cherry Sweet & Sour Cornish Game Hens

I have actually been thinking a lot about my blog lately, but without really writing much. It's kind of funny, but when I started out I never really decided what direction I wanted it to go. I just wanted it to revolve around food. Finally, I decided that I would try to incorporate a new ingredient or a new technique into one recipe for my blog every month.

IMG_0967

My decision to continue developing my culinary skills begins this year with a fabulously fun recipe, Cherry Sweet & Sour Cornish Game Hens. This recipe was a perfect choice to kick off the year as it involved a new ingredient (the game hens) and a new technique (brining).

IMG_0969

This recipe even got me to cook on the barbeque, which is something that I never do because, well, Diesel always does it for me! The barbeque is his domain, and this was only the second time in the course of our relationship that I have attempted to use it. So, while he slept, I cooked. And I was so proud of myself. This dish turned out very well, the meat was juicy and the saucy tangy. I really could not have been happier with how this recipe turns out and I think it is a good sign for the upcoming year.

IMG_0967new

Game Hen Brine
6 cups cold water
2 tablespoons soy sauce
1 tablespoon sugar
1 tablespoon kosher salt
1 teaspoon ground ginger
1 teaspoon red wine vinegar

Mix everything together in a large metal or glass bowl. Add game hens, completely submerging (A plate can be placed on top of the birds to hold them in the mixture). Let brine for 6 - 8 hours or overnight.


Cherry Sweet & Sour Cornish Game Hens
1/2 teaspoon olive oil
1 clove garlic, minced
1 teaspoon fresh ginger, grated
1/2 cup cherry preserves
2 teaspoon soy sauce
1 tablespoon rice wine vinegar
1 tablespoon hot Chinese mustard
1/2 lemon, juiced
1 teaspoon garlic chili sauce
1 1/2 teaspoon honey
1/2 cup dried sour cherries
2 Cornish Game Hens

Heat the barbeque to medium-high heat.

Heat the olive oil over medium heat in a small saucepan. Add the garlic and ginger and cook until softened and fragrant. Turn the heat down to medium-low and add cherry preserves, soy sauce, vinegar, mustard, lemon juice, garlic chili sauce and honey. Stir and let simmer for about 5 minutes. Divide the sauce in half leaving one half in the saucepan.

Oil the grate of the grill & place the hens over direct heat breast side up. Cook with the cover closed for ten minutes. Brush the hens with the 1/2 of the glaze not in the saucepan. Close cover & continue to cook for another 10 - 20 minutes until the hens are fully cooked.

Remove the hens from the grill and allow to rest for 5 minutes. While the hens are resting, add the dried cherries to the remaining glaze in the saucepan. Turn the heat to medium-low and allow to simmer for about 3 minutes.

Serve the hens over the wild rice, drizzling both with the remaining glaze.

(source A Good Appetite)

Friday, January 2, 2009

Buttery Jam Cookies

IMG_0925

Today was a very good day. Not only did I get to make these fun (purple!) cookies, but I finally caved and bought myself a stand mixer. It is so fantastic. Yay!

new mixer!

It made short work of the thick dough for these cookies, which the blackberry jam had turned a pale shade of purple. They were quite cute.

IMG_0927

Thursday, January 1, 2009

Peppermint Bark

IMG_0876

For the last month and a half, I have seen postings about peppermint bark everywhere. I love this stuff! It just doesn’t get better than peppermint and white chocolate in my book. But all of the recipes that I came across seemed kind of basic. The recipes didn’t seem to be adding value to the raw ingredients – the final product was the same as the recipe, white chocolate, dark chocolate, peppermints - until I visited my newest, favorite, drool-worthy blog, Orangette.

This recipe layers a bittersweet chocolate ganache in between layers of white chocolate and peppermint. YUM!

I had originally planned to make these treats with my other Christmas goodies, but I was so overwhelmed with everything else, I never quite got around to them. So even though I felt a little silly, I made a Christmas treat the week after Christmas. And I am so glad that I did!

These are GOOOOOOOD!

Did anyone ever see that Friends episode where Rachel makes the trifle for Thanksgiving but accidentally includes a layer of beef and onion? Joey eats it and says, “What's not to like? Custard? Good. Jam? Good. Meat? Gooooood!” This peppermint bark totally channels that moment.

IMG_0876_ edit_3

Three-Layer Peppermint Bark
17 oz. white chocolate, finely chopped
6 candy canes, coarsely crushed
7 oz. bittersweet chocolate, finely chopped
6 tablespoons heavy cream
¾ teaspoons peppermint extract

Line a 9- by 13-inch baking sheet with parchment paper.

Put the white chocolate a double boiler over medium heat. Stir occasionally until the chocolate lumps have all melted, and the chocolate is smooth. Remove the chocolate from the heat. Pour 2/3 cup of it onto the parchment paper. Using a spatula, spread the chocolate evenly over the parchment paper.

Sprinkle with ¼ cup of the crushed candy canes. Using a piece of parchment paper, gently press down on the candy to imbed it in the chocolate. Chill until set, about 15 minutes.

In a heavy medium saucepan, combine the bittersweet chocolate, cream, and peppermint extract. Warm over medium-low heat, stirring frequently, until the mixture is just melted and smooth. Cool to barely lukewarm, about 5 minutes.

Remove the baking sheet from the refrigerator, and pour the bittersweet chocolate mixture over the white chocolate. Using a spatula, spread the bittersweet chocolate in an even layer. Chill until very cold and firm, about 25 minutes.

Re-warm the remaining white chocolate over barely simmering water to 110°F. Working quickly, pour the white chocolate over the firm bittersweet layer, using your spatula to spread it to cover. Sprinkle with remaining crushed candy canes. Using a piece of parchment paper, gently press down on the candy to imbed it in the chocolate. Chill just until firm, about 20 minutes.

Carefully lift the parchment paper from the baking sheet out of the baking sheet. The bark can easily be broken into pieces by hand, into either bite sized or larger chunks.

Pack into an airtight container, with sheets of wax paper between layers of bark to prevent them from sticking to one another. Store in the refrigerator.

Note: This bark will keep for up to 2 weeks, if not more. Separate the peppermint bark from other treats in the package with parchment paper.

Yield: about 36 pieces

(source Orangette)

Wednesday, December 31, 2008

Tall and Creamy Cheesecake

IMG_0935

I really enjoy being a part of the Tuesdays with Dorie baking group. Over the last few months, I have had the opportunity to try out a lot of different kinds of treats. Additionally, I have been able to experiment with the recipes and try out different kinds of things, like this Black and White Cheesecake.

IMG_0937

Sometimes, though, I get really excited and try to rush through some of the instructions. Unfortunately, it turns out that you really do need to let the cheesecake cool and set before you cut into it. Or else this is what happens...

IMG_0942

But at least the picture turned out cute. I don't know why, but I really do love this picture.

Monday, December 29, 2008

The Best Cinnamon Bread. Ever.

When I moved into my first apartment the fall of my sophomore year at college, I was suddenly faced with the fact that I didn't know how to cook.

Cinnamonny goodness!

Growing up, my mother hadn't spent much time in the kitchen, and I had mastered her handful of go-to dishes by the time I had graduated from high school. And yet, I wasn't entirely ready to supply myself with my every meal. I missed my old dining commons and the convenience of always having freshly prepared food waiting for me.

My friends and I began sharing our cookbooks and recipes. We would sit around and copy recipes by hand from each others books.

This cinnamon bread treat was one of our early favorites and the first one that I helped to collaborate to write. I remember fiddling with the cooking time (it needed to be longer) and playing with the amount of cinnamon (doubling, then tripling it), the same kinds of things I do with recipes these days.

I love that making this bread reminds me of those times - the real beginning of my cooking career.

The Best Cinnamon Bread. Ever.
1/2 cup butter
1 cup sugar
2 eggs, separated
1/2 cup milk
1 1/2 cup flour
2 1/2 teaspoon baking powder
1 1/2 teaspoon cinnamon (I prefer to use freshly grated cinnamon, but the jarred stuff works too)

Preheat oven to 350 degrees. Butter and flour a loaf pan to cook bread in.

Sift together dry ingredients. Cream together butter and sugar.

Once butter and sugar are light and fluffy, add a third of the dry ingredients and stir until just mixed. Add a third of the milk and stir just mixed. Continue while alternating dry ingredients and milk until just combined.

Beat egg whites to stiff peaks in separate bowl. Fold beaten egg whites into batter. Stop as soon as eggs are incorporated so that bread does not become tough.

Pour batter into butter and floured loaf pan and bake for an hour, or until the top of the bread is golden and a toothpick inserted into the center comes out clean.

Once the bread comes out of the oven, cool on a rack. The bread can be topped with a pad of butter and/or a sprinkle of powdered sugar.

**When I have apple butter on hand, I often substitute out half of the butter for an equivalent amount of apple butter for an extra layer of flavor.**

Tuesday, December 23, 2008

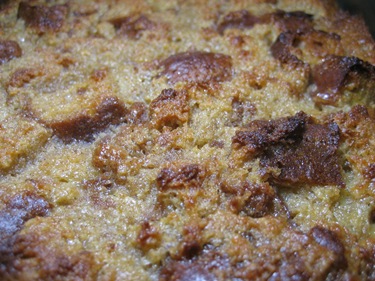
Cinnamon-Caramel Bread Pudding

My high school boyfriend took every opportunity he had to eat bread pudding. He loved the stuff, but I wouldn’t touch it. Ever. In fact, I always cringed when he ordered it off of the menu. It was gross and tended to have a lot of rum (yuck!) and raisins (double yuck!!) in it. For years, my feelings about bread pudding were influenced by the sticky glop that was bathed in the neon glow of cheap diners.

Some of my favorite things...

Little did I know, years later I would be introduced a bread pudding that would be much more my style – filled with chocolate and sweet bread. But that was just an introduction to everything that bread pudding could – and should – embody.

I made this recipe to take to the same party as the Mexican rice, and I thought it was fabulous. It was a far cry from the rum raisin monstrosities of my past. And, it gave me an excuse to make my newest favorite caramel recipe, as well as whipped cream from scratch, which is so much better than the canned kind.

Super smooth whipped cream!

The only problem I had with this recipe was the sheer amount of bread pudding it made! I ended up with way more than expected, and the 20+ people at the party only finished off about two thirds of it. The rest of the dessert remains in my refrigerator where it daily tempts me into eating enough of it to make myself sick. Actually, now that I think of it, I am kinda hungry…

Cinnamon-Caramel Bread Pudding
20 slices of cinnamon bread (or 1 1/2 loaves of this cinnamon bread)
12 eggs
2 ½ cups milk
1 cup whipping cream
1 cup sugar
2 tablespoons vanilla extract
1 ½ teaspoons finely grated orange peel
Pinch of salt

Cut bread into ¾ inch cubes. Whisk remaining ingredients together in large bowl until the sugar dissolves. Fold bead into egg mixture and toss to coat. Cover with plastic wrap and place in the refrigerator to chill four at least 4 hours or overnight.

When ready to bake the bread pudding, preheat the oven to 375F, stir bread mixture and let stand at room temperature for 30 minutes.

Pour bread mixture into buttered, 13x9 baking dish. Spread bread mixture until it is evenly distributed throughout the pan. Bake until golden and puffed up. Test doneness with a toothpick which should come out clean. This should take 40-55 minutes.

IMG_0815

Caramel Sauce
2 cups sugar
1/2 cup water
1 1/2 tablespoon corn syrup
2 tablespoons unsalted butter
2/3 cup heavy cream

Put the sugar, water and corn syrup in a medium heavy bottomed saucepan, stir just to combine the ingredients and then put the pan over medium-high heat.

Heat, without stirring , until the caramel turns deep amber, about 5-10 minutes. Lower the heat a bit and, standing back from the saucepan add the cream and butter. When the spatters begin to subside, stir to calm down the caramel and dissolve any lumps. Pour the caramel into a Pyrex measuring cup or heat proof bowl.

Allow the topping to set at room temperature-about 20 minutes before serving. The caramel can be put in an air tight container and stored in the fridge ahead of time. It will be the consistency of peanut butter but can be warmed up in the microwave to make it easier to work with.


Whipped Cream
1 cup heavy whipping cream
1 1/2 tablespoons powdered sugar (yo u can use more or less to adjust the sweetness of the final product)

Add cream and powdered sugar in a medium bowl. Beat with a hand mixer for several minutes until stiff peaks form. Keep refrigerated until use.

(sources: bread pudding - Gourmet magazine, caramel - Dorie Greenspan's book Baking: From My Home to Yours)
IMG_0809

Related Posts Plugin for WordPress, Blogger...